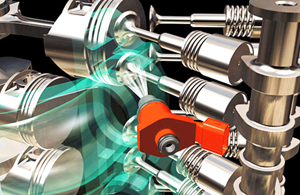
 Fuel injectors spray fuel directly into your engine’s cylinders during the intake stroke when a piston moves down to allow air and fuel to fill the cylinder chamber. When injectors are malfunctioning, leaking, or have failed completely, they will cause rough engine performance, poor idle, reduced power and economy, and exhaust that’s rich enough in unburned fuel to damage expensive exhaust parts such as oxygen sensors and catalytic converters. A bad fuel injector creates a no-fire condition in whatever cylinder it’s joined to, and back pressure will act as a brake on the engine – sluggishness which blocks it from achieving normal rpms. You’ll fail emissions inspection automatically because of the check engine light that has come on – triggered by those running conditions. Even if it hasn’t, you’d fail from fouled exhaust.
 For the purposes of this article, we’ll discuss the physical process of testing and replacing fuel injectors. Upgrading performance through more powerful injectors requires additional calculations of fuel flow and other criteria – for some background information, this youtube video will be helpful.
TOOLS AND EQUIPMENT NEEDED:
Replacement fuel injectors
Fuel injector tester or Multimeter / Ohmmeter
Needle nose pliers or flathead screwdriver
Fuel injector puller tool
Safety goggles
For reference, “port fuel injection” systems on most modern vehicles are set up with a fuel rail or rails (essentially a pipeline that fuel flows through) and injectors will be positioned in a row right on the rail by each cylinder. 1980s and older vehicles may have a “throttle body” fuel injection system. Instead of fuel rails, one carburetor-shaped throttle body assembly on top of the intake manifold serves as a mounting point for all the fuel injectors. Whichever type of system your vehicle has isn’t particularly important, because injectors are fitted in the same basic fashion.
TESTING FUEL INJECTORS
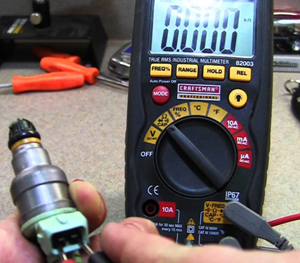
In this picture, a fuel injector is being tested for electrical resistance with an ohmmeter. While the injector shown here has been removed from the vehicle, this type of testing can be done without doing so.
With a repair manual or downloaded instructions for your vehicle in hand, remove any items in order to get to your vehicle’s fuel injector system. Some systems are easy to access, and others may be buried further underneath other mechanical items or plastic cover pieces. Testing a fuel injector with a multimeter or ohmmeter can be done without removing the injector. To uncouple the wiring connector on top of the injector, carefully remove any spring clips with a flat head screwdriver, pliers, or other narrow-pointed tool (see picture under Replacing Fuel Injectors further below). Touching positive (red) and negative (black) leads of the tester to prongs on the electrical connector will produce a reading of how well the injector is functioning. Your vehicle may have “High Impedance” or “Low Impedance” type injectors – since normal ohm readings for both types will be different, it’s best to check with your vehicle manufacturer to verify equipment and related specifications.
Another way of testing fuel injectors is by the use of a simple test light, or Noid light. After connecting the sensor to any injector, a light will flash if pulses from the fuel injector are detected. A flashing light while the ignition is being cranked indicates normal pulses, while no light or a constant light indicates a problem.
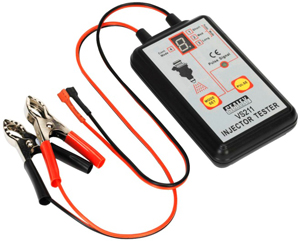
Shown here is a typical fuel injector tester which will pulsate a fuel injector and generate a digital pressure reading to compare against others on the vehicle.
Other types of testers will pulsate a fuel injector to generate an actual fluid pressure reading. Connect your fuel injector tester and, without starting the engine, turn the ignition key to the ON position so the fuel pump activates to build pressure in the system. Do this for all the injectors then compare readings. Fuel injectors with a significant difference above or below the average are malfunctioning and should be replaced. If you must remove injectors in order to test them this way, read the guidelines further below regarding removal and installation.
REPLACING FUEL INJECTORS
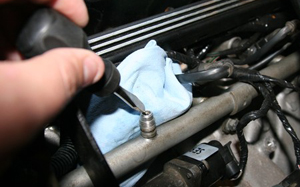
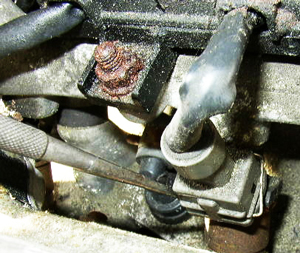
Fuel lines on many vehicles will be equipped with a pressure relief valve as seen in this photo. Depressurizing the lines is an important first step when removing an injector.
Unless you can confirm spray pattern and flow volume of your new injector(s) are exactly the same as the old ones, it’s a good idea to replace all fuel injectors as a set. Whether you’re replacing one or multiple injectors, it takes the same amount of labor to reach them. Releasing high fuel pressure in the lines is an important first step in the injector removal process. Once that’s done, your fuel system will be depressurized and gasoline will not spew dangerously out during stages of injector replacement. Some amount of fuel will spill no matter what preventative measures are taken. For safety and fire prevention, disconnect the negative terminal on the battery to ensure no electrical items are live.

Another way of depressurizing a fuel system before disassembling any fuel components is to remove the fuse or relay for the fuel pump. Start the engine and let it run until it stalls so that any fuel left in the lines is drawn out.
IF YOUR VEHICLE IS EQUIPPED WITH FUEL RAILS
Many vehicles equipped with fuel rails may have a relief valve (often in the form of a Schrader valve) or a bolt which can be loosened to bleed off residual pressure. If a relief valve does not exist or cannot be located, another method is to locate the fuse or relay switch for your fuel pump, then start the engine. With the engine running, remove that fuse. Now that the fuel pump is no longer active, the engine will continue to draw remaining fuel out of the lines before stalling.
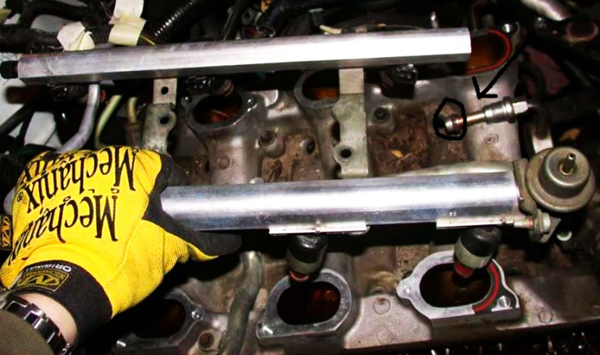
To access fuel injectors for removal and replacement, disconnect the main fuel line (circled), unbolt the fuel rails, then pull the rails gently upward.
If your vehicle does have fuel rails, they must be removed in order to properly access the injectors. To do so, first disconnect the main fuel line at the end of the rail along with any lines at the opposite end. Unscrew bolts or screws securing the rail in place, uncouple related wiring, then pull the rail away from the fuel injectors. Disconnect electrical plugs on top of each fuel injector using a flathead screwdriver to wiggle a small hold down spring loose.
To uncouple electrical wiring on top of an injector, carefully remove any spring clips with a flat head screwdriver, pliers, or other narrow-pointed tool.
To prevent damage to any fuel injection components and ensure no broken bits fall into the cylinders of your engine, remove the injectors using a fuel injector puller tool. Shape and size of the tool may vary depending on fuel injector design for your vehicle, but a puller is essential because fuel injectors are oddly shaped. It allows grip and torque to be applied to the injector casing during removal without stressing any delicate, breakable sections. Lubricate the seals on replacement injectors, then install. Connect and reinstall all other components carefully in opposite order they were removed.
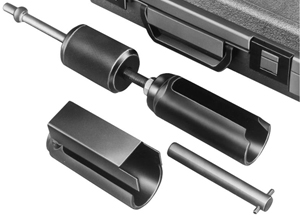
Shown in this photo is a typical fuel injector pulling tool. Using one of these is important because it avoids damage to delicate parts of the injector housing.
IF YOUR VEHICLE IS NOT EQUIPPED WITH FUEL RAILS
As mentioned earlier in the article, if your fuel-injected vehicle does not have fuel rails, injectors will be together in one spot. A throttle body assembly placed where a carburetor would be usually serves as the host for injectors that are grouped on top of it.
Once you locate your fuel injectors, carefully uncouple the electrical connectors at the top. There may be tabs that release easily after being squeezed by hand, or you may find it necessary to use a flathead screwdriver, pliers, or other fine-pointed object.
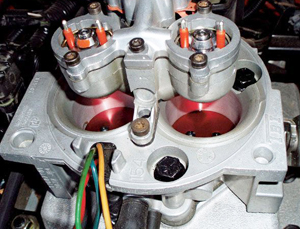
Shown here is a throttle body assembly without fuel rails. Instead, fuel injectors are mounted in the two circular pods at the top. In this photo, electrical connectors have been removed.)
Unbolt any hold-down screws or nuts, then grab the center of the injectors with a pair of pliers and rotate – this will break it loose for removal. Upon reinstallation of new fuel injectors, lubricate any rubber O-rings with fresh motor oil to ensure they slide in place easily. Also use new gaskets, if applicable.
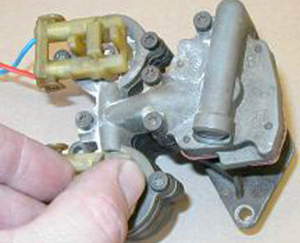
(Caption for above photo: In this picture, a throttle body has been removed from the engine with electrical connectors in place. To remove the injectors, unbolt any hold-down screws or nuts. Grab the center of the injectors with a pair of pliers and rotate in order to break them loose and remove.