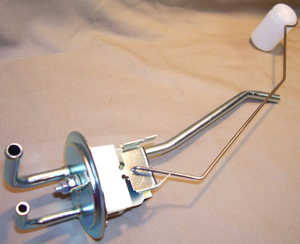
Many automakers design fuel sending units with a float piece that’s an attachment on a hinged arm which swings up or down as the level in the tank fluctuates.
Fuel sending unit is a term for the mechanical assembly inside your fuel tank which measures the level of liquid within, then reports its findings to the fuel gauge inside your instrument cluster. All sending units contain a “float” piece which does just what it describes – floats atop the surface of the fuel. Many automakers design the float piece as an attachment on a hinged arm that pivots as the level in the tank rises or drops. Others design the float piece as a cylinder that rides up and down around a metal shaft.
TOOLS NEEDED:
Flat head or Phillips head screwdriver
Hammer
Open-ended wrenches
Replacement fuel sending unit
Rubber gloves (optional)
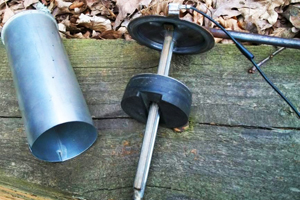
Other automakers design fuel sending units with a float piece that rides up and down around a metal shaft.
Whichever design is used, the float piece will typically contain a small resistance wire that forms a “U” in the sending unit. As the float descends, the electrical resistance increases as the wire path becomes longer. From that, a transducer in the sending unit produces a measurement that will tell the fuel level gauge needle where to point. When the float gets near the bottom, it will contact a metal piece, creating a ground. This registers as a low fuel warning light.
Over time, the electrical components in fuel sending units can short out and produce no fuel level reading, or the mechanical components can bind up and produce a non-changing, fluctuating, or completely inaccurate reading. Because the fuel sending unit assembly is mounted at the top of your fuel tank, it’s relatively easy to replace on most modern vehicles equipped with purpose-built access ports. In this article, we’ll cover the steps involved in replacing the fuel sending unit on vehicles where easy access is possible.
STEPS INVOLVED
 1. Because your fuel lines remain under pressure (very high pressure on some vehicles), it’s important to relieve that pressure first. Check your owner’s manual for the location of the vehicle’s fuel pump relay, and remove the relay to deactivate the fuel pump. Turn the ignition key to crank the engine, which will start and stall several times once no fuel is being pumped to it. When the engine no longer catches even a little, the fuel lines you’ll be disconnecting have been depressurized.
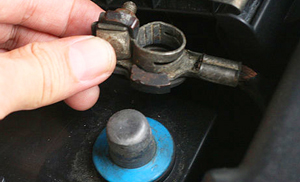
 2. Disconnect the negative battery cable to ensure any possibility of sparks around gasoline is eliminated.
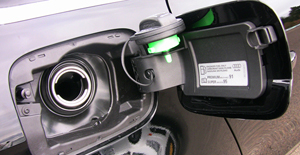
3. Open your fuel cap to relieve any built up pressure in the tank.
 4. Consult a repair manual for your specific vehicle to locate where the access port for the top of your fuel tank is. On most cases, the top of your fuel tank can be accessed by opening a “trap door” that’s located underneath the rear seat cushion or underneath carpeting on the trunk floor. The removable cover piece should be secured by screws or small bolts that require only basic hand tools to remove. Vehicles with rear seat access typically design the seat cushion so it’s easy to pull out.
If you have an older vehicle without a fuel tank access panel, the whole fuel tank will need to be unbolted and dropped down – a separate process we won’t be covering in the scope of this article.
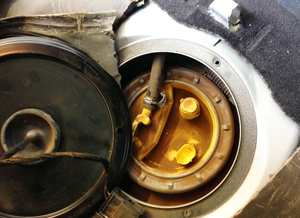
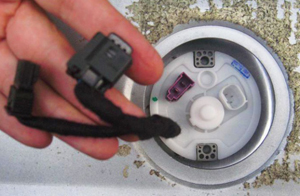 4. Once the access cover panel has been removed, you’ll be looking directly down at the top of the fuel tank. You’ll see what looks like a round lid – this is actually the top of the fuel sending unit assembly. On it, there’s a connector (or connecters) for the wiring harness that signals your fuel gauge about how full the tank is. Unplug any connectors and move the wiring to the side.
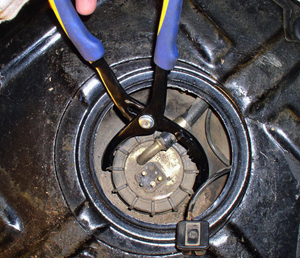 5. Remove any bolts that are holding the fuel sending unit lid in place. If there are none, it’s probably designed to unscrew counter-clockwise like the lid of a jar. You won’t need to twist it very far before it unlocks, but you may need to break it loose with a gentle tap. The edge of the lid piece will have multiple notches – insert a screwdriver end in one of the notches, then use a hammer to tap the screwdriver head. A pair of channel locks (shown in the picture on the right) may work more effectively depending on application. If you feel that your tank seal or lock ring piece is worn, now is the time to replace that as well.
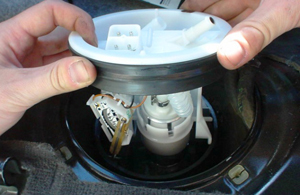 6. Remove the old fuel sending unit by pulling the assembly up through the top. Because there’s a long rod and float piece, angling it out may be necessary.
Note: Many vehicles position their fuel filter in this location at the top of the tank also. If yours is one of them, make sure you also have a new fuel filter to install before putting in the new fuel sending unit.
7. Install your new fuel sending unit, reconnect wiring, and secure all covers in the reverse order they were removed.