The purchase of a new radio and speakers brings the promise of better sound, the excitement of new features, and the enjoyment of simply feeling the music that wasn’t possible with a factory stereo. In this article, we’ll give you the general basics of radio installation. And before you tear your old stereo out of the dash, read this entire article first because we also discuss a few things you’ll need in order to avoid roadblocks. In short, if the radio you’re purchasing doesn’t come with a vehicle-specific dash kit, radio wiring harness, and antenna connector, it’s in your best interest to purchase them separately to ensure you get the most enjoyment out of your hard-earned money.
“SINGLE DIN RADIOS” vs “DOUBLE DIN RADIOS”
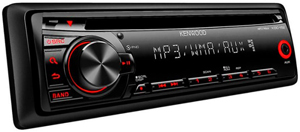 You may encounter these terms when dealing with new car stereos. A “single DIN” aftermarket radio refers to the fact that it has a similar size to traditional factory in-dash stereos and offers radio and single CD capability.
 A “double DIN” aftermarket radio is taller than traditional factory radios because it usually features a large touch-screen or additional control buttons arrays. These may require cutting of the dash, or a vehicle-specific dash kit with a new console fascia piece that relocates control buttons for other systems displaced by the larger size radio.
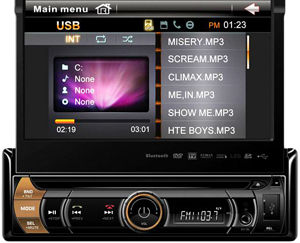 Some hybrid single-DIN radios are designed in a slimmer, compact size but offer double-DIN functionality via a motorized touch screen that slides out horizontally, then flips up vertically.
REMOVING YOUR OLD STEREO FROM THE DASHBOARD CONSOLE
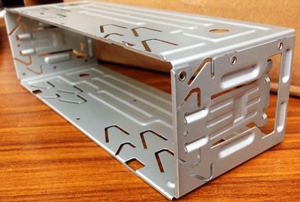
Shown here is a metal sleeve that many car stereos sit inside of. The sleeve bolts inside the radio cavity of the vehicle console, and the radio slides into and out of the sleeve. Removing a radio from a sleeve typically requires releasing spring loaded clips with a special set of “DIN tools”.
After unhooking your negative battery cable to eliminate any chance of damaged equipment through short circuiting, you’ll need to determine which way your factory radio is bolted in. Most OEM radios are either mounted inside a metal sleeve or bolted to the dash with brackets.
If you see two sets of small holes along the left- and right-side face of your radio, you’ll need a set of U-shaped metal hooks known as “DIN tools”. Inserting the U-shaped hooks in the receptacle holes allows you to trigger and release two spring clips inside the radio that hold it in place.
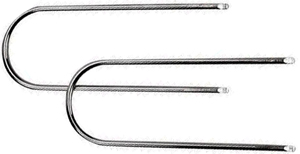
In this picture, you’ll see a set of U-shaped metal DIN tools used for releasing spring clips that secure a radio within a metal sleeve.
Simply insert the DIN tools and wiggle them until a click is heard as the spring clips are released. Pull the ends of each DIN tool away from each other (similar to pulling on a wishbone) so their shape widens and provides more grip for pulling the radio out of the dash. If you don’t have DIN tools and are in a hurry, you might have success cutting and bending wire hangers to fit – however, ends may need to be filed to a tapered point in order to be effective.

Here, a radio is being removed from its sleeve with the use of DIN tools.
If your radio’s bolted in place, you’ll probably need to pry one or more cover panels off first. Check with your vehicle manufacturer for specific instructions on how to do this, as pressure clips are often hidden in odd places. Once cover trim is pulled away, remove any bolts or screws (in most cases there will be four) that secure your radio to side brackets or to the front of the dash. Pull the old radio out and disconnect any wiring harnesses.
Some radios bolt directly to the vehicle console instead of to a sleeve. After removing the factory trim cover piece, a basic screwdriver or socket wrench is all you’ll need.
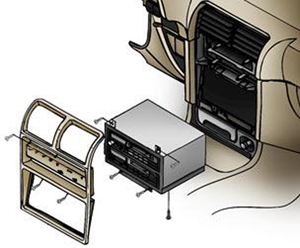
If your vehicle has a metal sleeve for the radio, check to see if your new radio is an exact fit for it. Assuming they’re not compatable, you need a Dash Kit that’s specific to your vehicle. You’ll probably also need a few things which we’ve listed below.
VEHICLE-SPECIFIC DASH KIT
 Dash kits mate a universally-sized radio to popular makes and models. These will be a big help, because no radio is going to be an exact fit unless it was designed by the vehicle manufacturer. A kit will come with customized mounting brackets and a fitted radio sleeve – both with pre-drilled holes to match those on your vehicle’s console frame. Hardware that’s the right size lets you physically mount your new radio in place so that it fits and looks right.
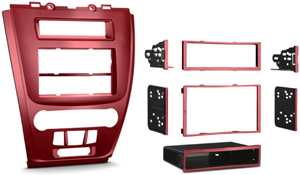 Unlike dash kits of yesteryear which used plain, dull black panels to fill any gaps, today’s dash kits have much better-looking filler panels – ones designed to match the factory look and finish of your surrounding console. If your newer vehicle has integrated controls for climate control, door locks, and other interior controls, replacement dash panels available on the market also offer up similar buttons and controls. OEM features such as digital display for dual-zone climate settings, colored LED lighting, and soft touch buttons may also be found on aftermarket radio dash kits, and many can also be programmed to retain specific functions such as OnStar, navigation, and Bluetooth pairing.
VEHICLE-SPECIFIC WIRING HARNESSES
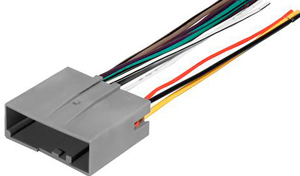 There’s no universal standard followed in the automotive industry when it comes to OEM wiring for stereos. Aftermarket radio manufacturers also have their own preferences when it comes to wiring and wiring harnesses, so it’s a given the two ends will not be compatible. A vehicle-specific wiring harness cures these woes because it’s been specifically designed to bridge this gap. In effect, it serves as an adapter piece between your new radio and your vehicle. The aftermarket wire harness connects into the OEM harness and allows you to connect the Frayed ends of the aftermarket wire harness to the aftermarket radio.
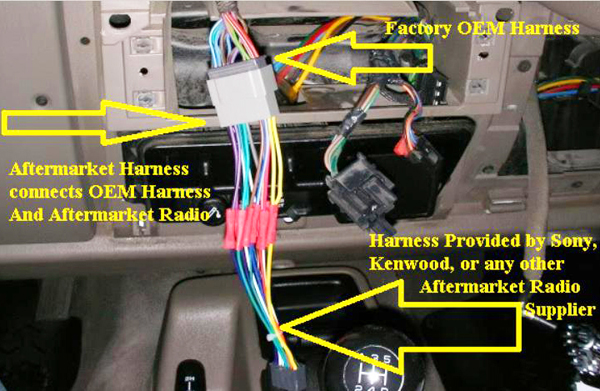
This picture shows an example of how a vehicle specific wiring harness serves as an adapter piece between a vehicle’s OEM radio wiring harness and the harness provided with an aftermarket radio.
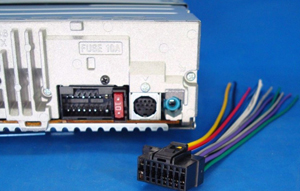
This picture shows a Sony aftermarket radio and the wiring harness provided with it.
In some cases, you’ll need to splice each of those vehicle wires into the back of the connector piece on the vehicle specific wiring harness. It will be easy, because each hole on the connector piece will be color coded to match your make and model’s wiring for speakers, vehicle data bus body control modules, and more. The vehicle specific wiring harness connector piece will then snap in place on the back of your radio.
VEHICLE-SPECIFIC ANTENNA CONNECTOR
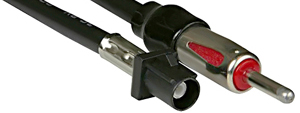
This picture shows the ends of a typical vehicle-specific antenna connector.
Wiring that comes from your vehicle’s antenna is separate from other radio wiring, and it may come in the form of a single plug, a connector piece, or loose wires. Similar to wiring that leads to speakers, there are too many variations for aftermarket radio manufacturers to keep up with. Sometimes automakers make changes to radios during the lifespan of an antenna assembly design, or vice-verce. As a result, your new radio will have a universally-designed input jack. Purchasing a vehicle-specific antenna connector gives you the adapter piece you need to connect your antenna wiring to the radio for strong, effective signals that can be heard clearly.
STEERING WHEEL AUDIO CONTROLS

An example of a steering wheel control interface that allows you to retain the function of steering wheel-mounted radio controls with an aftermarket stereo. The interface piece will typically mount in sequence with your vehicle specific wiring harness.
Does your vehicle have audio controls on the steering wheel? If so, you’ll want a Steering Wheel Control Interface piece to ensure any factory controls on the steering wheel continue to work with your new radio. To minimize the amount of room required, the interface piece will typically mount in sequence with your vehicle specific wiring harness. As a side note, if you’ve got an On-Star system on your vehicle, your new aftermarket radio may require an OnStar Radio Replacement Interface to retain that functionality.
INSTALLING YOUR NEW RADIO IN THE DASH
Once you’ve got all necessary pieces connected, bolt any new metal sleeve in place that comes with your vehicle-specific dash kit first. It should fit in your vehicle’s radio cavity snugly without modification, and mounting holes should match those already on your vehicle. Follow the instructions that came with your in-dash kit on how to bolt the radio securely to the sleeve. Install old or new trim pieces once you’ve confirmed the radio is secure and powers up.